Embedded designs are around for a while now and several Livingdocs customers use them productively. The main difference to a reference design is that embedded designs are stored in the Livingdocs server database and are part of the project config. This means that updates to an embedded design are done via the CLI as described here.
The main benefit for customers is that they can completely separate Livingdocs designs from whatever technology they want to use in the frontend. E.g. Swisscom has embedded designs in the server project and uses the HTML framework nitro in the frontend (without any dependency on Livingdocs).
Overview
Prerequesites: you need to have a configurable channel, meaning that your Livingdocs configuration is done via a seeding process of project configuration files in your server repository and not via static configuration files.
In order to go from a reference design to an embedded design the following steps are necessary:
- migrate the design config from v1 to v2 (currently, all reference designs we know of are v1)
- move all design specific files (design_settings and all components) to the server repository (and out of your frontend)
- setup an asset workflow (css and js)
- migrate all existing documents to the embedded design
Migrate design config
The rules on how to migrate the design are described here. We have an unofficial helper script that can be used. It can be considered an alpha version and has successfully been used to migrate several projects. We want to test it some more before we take it to the official command list.
For the adventurous
The script can be called from the code repository of the livingdocs-cli. With the checked out code, you can run the following command from the CLI:
./bin/run project-config:import-design --designUri="https://your-design-host.com/path-to-your-design/your-version" -d="/path/on/your/drive"
The path on your drive needs to be a project config folder. This can either be an existing project config in your server project (if you have this) or one that you downloaded via the Livingdocs CLI.
The task will create a file design_settings and a components folder with all components and link them in the config respectively.
Please manually check the migrated design before pushing it to a productive system.
Add design to your server
In your server project you will want to add a seeding config containing your new design. An example for a local seeding config is given below.
In app/server.js
await tasksApi.setupProjects(
  {
    users: [],
    projects: [
      {
        __recreateIfExists: false,
        __update: true,
        handle: 'my-project',
        label: 'Foo Bar',
        owner: ':developer',
        groups: [
          {
            label: 'Editors',
            scope: ['articles:read', 'articles:write']
          }
        ],
        groupMemberships: {
          Editors: [':editor']
        },
        config: require('path/to/your/config')
      }
    ]
  },
  {useDevUsers: true}
)
The important line is config: require('path/to/your/config'). Here you point your project setup to the project config containing the embedded design (basically what you did in the first step).
If you already have a project config, make sure that you require the new file design_settings as well as all components in the components folder that you migrated above.
You can easily test your embedded desig with a local seeding config by just restarting the server and observing the command line. If the project seeding succeeds, your config is fine.
Setup asset workflow
Design assets need to be accessible for both the editor as well as the end-user facing delivery. We strongly recommend the use of a high availability object storage like AWS S3, Google Cloud (Object) Storage or any other object storage. Usually you can setup a CDN in front of your object storage to optimize your asset delivery and consumption.
Design assets configuration
In the design_settings file (see above), you can specify the location where your required assets are located:
{
  v: 2,
  settings: { /* omitted for illustration purpose */ },
  editorSettings: { /* omitted for illustration purpose */ },
  designSettings: {
    assets: [
      'https://cdn.example.com/1.0.0/styles.css',
      'https://cdn.example.com/1.0.0/scripts.js'
    ],
    componentGroups: { /* omitted for illustration purpose */ }
  }
}
We recommend prefixing your assets with a versioning e.g. 1.0.0, 1.0.1 (semantic versioning) which allows to roll back to a specific verison, gives better control over caching policies and provides a better ground for reasoning in case of debugging and communication.
Design assets publishing workflow
Ideally you have a webpack (or similar) development setup in your delivery project which allows to work on the design locally and observe the changes directly. Once you are happy with your changes, you’d build your assets and use a upload script to publish your new design version to the object storage. As steps:
- Work on a new design version (dev mode)
- Once finished, build the assets and upload, using an incremented prefix (folder) e.g.
1.0.0->1.0.1, to the object storage via an upload script - Once uploaded, bump the version prefix in your
designSettings.assetspath entries configuration - Run the project seeding on your servers
- Optionally, you can migrate old documents to the new design version (automatically created via the project seeding)
- Done, the editor would use the new entries now, you can read the design version from the project configuration also in the delivery project to make sure you have a single point of truth (allows to roll back etc.)
Migrate old documents to embedded design
 The functionality described here was removed in
 release-2025-03. If you’re on a later release and migrating to an embedded design, please contact your Livingdocs Customer Solutions representative for assistance.A migration from a reference design to an embedded design should always be a bump migrations. You are responsible to make sure of this. The migration of a certain version, say 1.2.3 of a reference design to the first version (1.0.0) of an embedded design is always non-breaking, i.e. the migration itself does not change anyhting to the logic of the design. You should never mix a migration to an embedded design with new design features or refactoring, take those aparat into 2 steps. Also, you need to make sure that you always migrate from the last version of your reference design (1.2.3 in the example above) to the first version of your embedded design (1.0.0). If you migrate older documents, say 0.8.1, then split into 2 steps:
- migrate your reference design from 0.8.1 to 1.2.3 (with a migration file if necessary)
- bump reference design 1.2.3 to embedded design 1.0.0
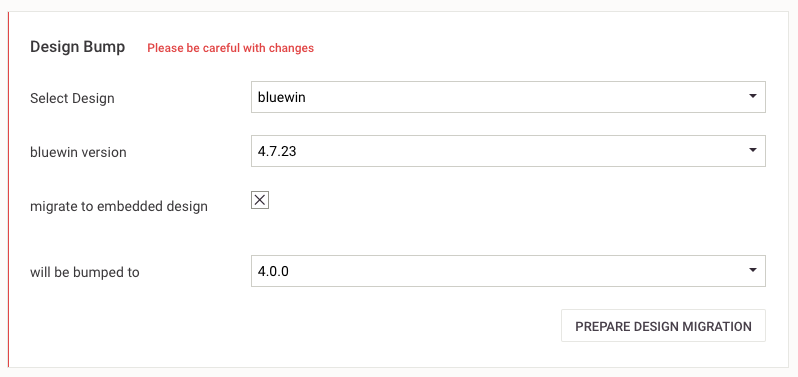
There is currently no support for bump from a reference design to an embedded design over the CLI, but the UI allows you to do so.
Navigate to “Project Setup / Design Migration”. If your project config is setup correctly and contains an embedded design then you will have the option to choose “migrate to embedded design” in the Design Bump setup. The option is only shown when you already have a document created with the embedded Design version. Just check this and make sure the version of the reference design and the embedded design are correct.