 Desk-Net rebranded as Kordiam. Consequently, Desk-Net Schedule has been deprecated as of
 release-2024-11 and will be removed in release-2025-05. Please use Kordiam Schedule instead. For more details, refer to our Desk-Net to Kordiam migration guide.The Desk-Net Schedule side panel can be configured to only display for certain content types, for example pages to help with page management. This step can also be done without mapping Desk-Net values, but this will result in the side panel displaying document titles instead of document reference cards.
Setup
Content type config
Add the li-desknet-schedule metadata plugin to the content type that you would like the side panel enabled for:
{
  handle: 'page',
  documentType: 'page',
  // ...
  metadata: [
    // ...
    {
      handle: 'desknet-schedule',
      type: 'li-desknet-schedule',
      config: {
        // Optionally filter the documents which are displayed in the side panel
        filters: {
          linkedDocumentsOnly: true,
          elementStatusIds: [1, 2, 10322, 10332],
          publicationStatusIds: [5]
        }),
        // Only required if li-desknet-integration is not used.
        // It will compare the metadata value from the path provided
        // with the externalElement.id property in the Desk-Net element.
        desknetExternalElementIdMetadataPath: 'myExternalSystem.id',
        // Enable a button in the side panel which triggers a create flow
        automaticPlacementCreationFlowHandle: 'myDesknetGenerateContentFlow'
      },
      ui: {
        label: 'Desk-Net Schedule',
        config: {
          placeholder: 'Select a Desk-Net platform or category',
          // Use a custom table dashboard for the side panel
          useDashboard: 'articlesSimple'
        }
      }
    }
  ]
}
Adding a platform or category to a page
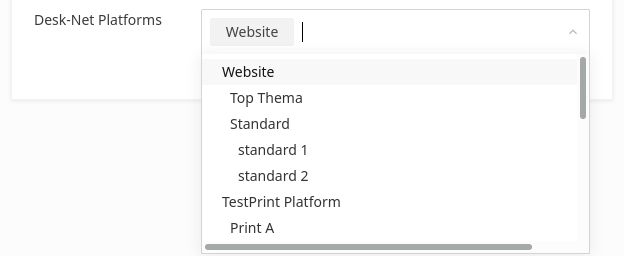
Once you have made the config changes above you should be able to see a disabled Desk-Net button in the editor toolbar when viewing a document of the configured content type. To enable the button you need to go to the metadata screen of the document and select any relevant platforms, categories, or subcategories. Articles within the selected tree branches will be displayed in the side panel.
Using the side panel
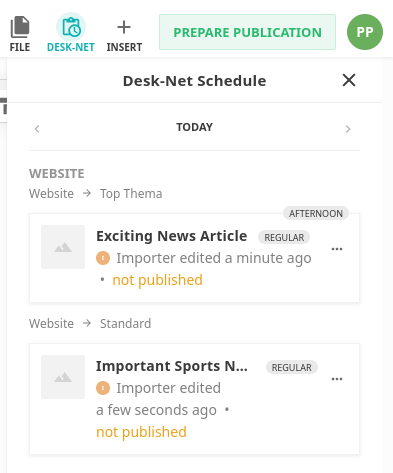
A user can change the date to see the scheduled articles in the configured platforms or categories. If the Desk-Net story is linked to a document in Livingdocs then it is possible to drag the story on to the page to create a teaser.
Automatic Teaser Placement
Along with manually dragging stories from the side bar on to the page to create teasers, it is also possible to register a document generate function to update or re-generate the content for the current document.
This feature should be considered beta.
Register Generate Function
To begin with you should register a new generate function in your server runtime config. Below is an example function which demonstrates the possibility of merging existing document content with new content which is generated from the Desk-Net Schedule:
liServer.registerInitializedHook(async () => {
  const documentApi = liServer.features.api('li-documents').document
  documentApi.registerGenerateFunction({
    handle: 'generateTeasersFromDesknetSchedule',
    async generate({projectConfig, userId, params = {}, context = {}}) {
      // Extract Desk-Net elements from schedule tree
      function extractElements(accumulator, node) {
        const elements = node.elements || []
        const nestedElements = node.categories?.reduce(extractElements, []) || []
        return [...accumulator, ...elements, ...nestedElements]
      }
      const document = context.document
      // Keep the first title (if it exists)
      const title = document.content.find((c) => c.component === 'title')
      // Generate a paragraph for each Desk-Net element
      const elements = (params.schedule || []).reduce(extractElements, [])
      const elementComponents = elements.map((element, index) => ({
        component: 'p',
        content: {text: `${index + 1}. ${element.title}`}
      }))

      return {
        content: [title, ...elementComponents].filter(Boolean)
      }
    }
  })
})
The main differences between this “generate content” function and a standard create function is that we provide the current document in the context object so that it is possible to re-use existing components. In addition to this, the return value should be an object that only contains a content property which is a component tree (an array of component objects).
The Desk-Net Schedule loaded in the editor is passed to the function as params.schedule, and it has the following tree structure:
[
  {
    id: 1,
    label: 'Platform 1',
    breadcrumbs: ['Platform 1'],
    categories: [
      {
        id: 2,
        label: 'Category 1',
        breadcrumbs: ['Platform 1', 'Category 1'],
        categories: [
          {
            id: 3,
            label: 'Subcategory 1',
            breadcrumbs: ['Platform 1', 'Category 1', 'Subcategory 1'],
            elements: [
              {
                // Full Desk-Net element
                id: 4,
                title: 'Article 1',
                publication: {},
                // ...
                // Additional linked document (if available)
                document: {}
              }
            ]
          }
        ],
        elements: [{id: 5, title: 'Article 2', publication: {...}}]
      },
      {id: 6, label: 'Category 3', breadcrumbs: [...], categories: [...], elements: [...]}
    ],
    elements: [{id: 7, title: 'Article 2', publication: {...}}]
  },
  {id: 8, label: 'Platform 2', breadcrumbs: [...], categories: [...], elements: [...]}
]
The elements array will contain full Desk-Net elements with an additional document property if a link between the Desk-Net element and a Livingdocs document can be found.
Update Project Config
The next step is to link the create function to a document creation flow. You can do this by modifying editorSettings in your project config:
{
  // ...
  editorSettings: {
    // ...
    documentCreationFlows: [
      // ...
      {
        handle: 'myDesknetGenerateContentFlow',
        createFunction: 'generateTeasersFromDesknetSchedule',
        createButtonLabel: 'Generate Teasers' // Default: "Run Automatic Placement"
      }
    ]
  }
}
Update Metadata Plugin
Finally, you need to update the li-desknet-schedule metadata plugin with the automaticPlacementCreationFlowHandle. Once this is setup then a button will be added to the Desk-Net Schedule side panel to trigger the document update.
{
  handle: 'desknetSchedule',
  type: 'li-desknet-schedule',
  config: {
    automaticPlacementCreationFlowHandle: 'myDesknetGenerateContentFlow'
    // ...
  }
  // ...
}