In this section you get an overview of basic principles of includes. If you want to know more about Includes in general, go to Includes Overview.
Summary of a doc-include
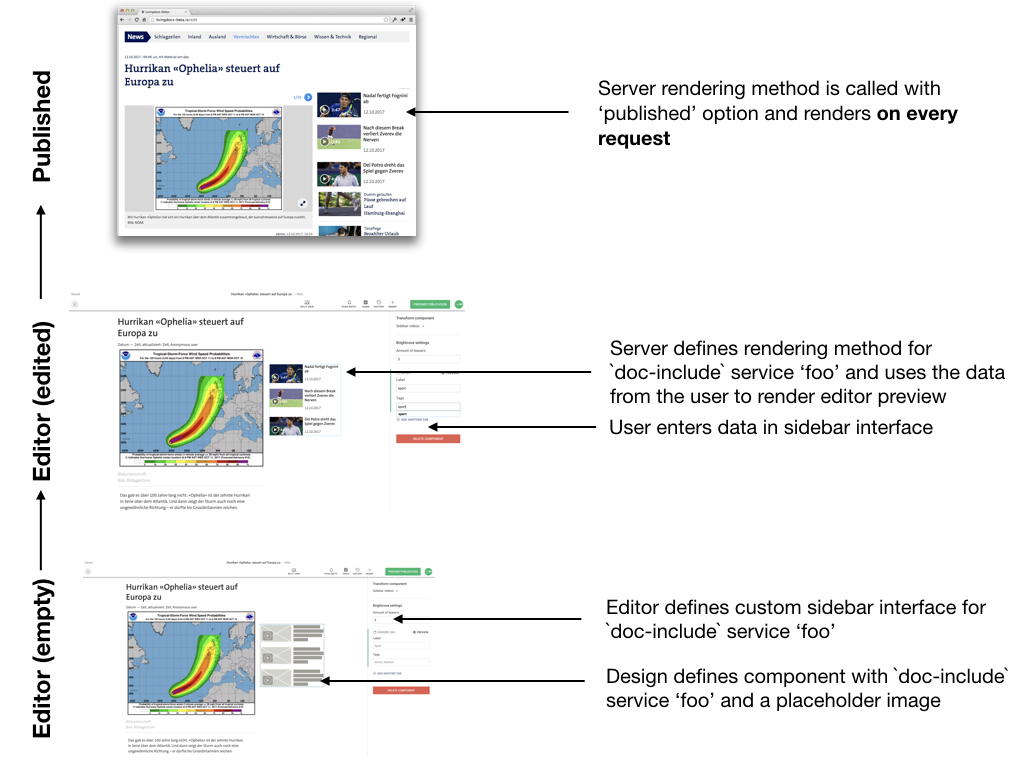
Above you see a lifecycle diagram of a document with a doc-include (from bottom to top).
- You see an empty placeholder (a
doc-includewith a server-side registered serviceyour-include-service) - The user can choose an entry in the sidebar (a core or custom UI registered in the editor or a form generated based on the
paramsSchema) - After selecting an entry, the server calls a rendering function of the service
your-include-serviceand shows the result in the editor as preview (WYSIWYG). In the image above those are some brightcove video teasers. - After publishing, whenever a reader loads the published document in the browser, the server-side rendering function of the service
your-include-servicegets called again.
The last point is worth mentioning again: rendering of a doc-include is done on every request, that means you don’t need to publish the entailing document in order to update the doc-include area, this happens automatically on request.
Concept of an include
You should be familiar with Livingdocs directives for this section.
<script type="ld-conf">
  {
    "name": "example",
    "label": "Example Component",
    "directives": [
      {
        "name": "example-include",
        "type": "include",
        "service": "your-include-service",
        "defaultParams": {
          "layout": "mostViewed"
        },
        "config": {
          "minCount": 3,
          "maxCount": 6
        }
      }
    ]
  }
</script>

<div class="page-teaser full-width-on-mobile">
  <div class="teaser-list__head">
    <h4
      class="teaser-list__title"
      doc-editable="title"
    >
      Title
    </h4>
  </div>
  <div
    class="page-teaser__content page-teaser--count"
    doc-include="example-include"
  >
    <div class="embed headlines">
      <div class="placeholder"></div>
    </div>
  </div>
</div>
The above snippet shows the design definition of a doc-include that renders the most viewed articles from a brightove channel (as in the introductory diagram).
You see several important concepts:
- The
serviceconfiguration defines which service is used by thisdoc-includedirective. This service name is used by the server-side and editor-side customizations to identify a specificdoc-includeimplementation. - The directive configuration contains
defaultParams. The custom editor interface for adoc-includeservice normally sets and sends parameters to the server-side to do the rendering. In the example it could send a category that a user enters and for which videos are shown (e.g. most viewed “Sport” videos). In addition you can passdefaultParamsin the design that are there by default and if the editor does not overwrite them are passed to the server. Thelayoutin our example tells the server-side plugin to use a specific sub-template for the rendering. You could for example have templates for “list with images” and “text only list” thus rendering the section with different layouts in different components. - The directive configuration also contains a
configsection. You can write in this Object whatever you like. The values are passed to your custom user interface in the editor and you can use them there to customize the user interface for this specific instance of the “your-include-service”doc-includeservice. The example sends aminCountandmaxCount. This is used by the user interface in question to offer the user a number input form that is limited to numbers between 3 and 6 and controls how many articles are rendered.
Schematic view of how the different parts play together using a doc-include service as an identifier:
Livingdocs design component -> uses service in directives -> configures an instance of the service "class" (config, defaultParams)

Livingdocs editor -> implements -> user interface for doc-include "class"

Livingdocs server -> implements -> renderer for doc-include "class"
(note: we are not talking about a class in the sense of OO, just to visualize the hierarchical connection)
It is important to understand that a doc-include service (“your-include-service” in the example above) can be used in multiple components/directives in different configurations. For example you could do a new component that is pretty much the same as the example above but changes the minCount to 6 which would in effect tell the user interface not to render a number input (if minCount == maxCount no interface is rendered).
What are the customizations
The server customization is a custom server function which defines the rendering as a Design Component (or HTML). The editor customization can be done in 2 different ways: a schema describing the params or a Vue component.
Both customizations are optional.
- A
doc-includeservice with neither server nor editor part would just render an empty placeholder into the rendered HTML wherever a respective component was dropped. - A
doc-includeservice with only an editor part would render a placeholder with all the parameters in the HTML (the editor part can store parameters on thedoc-includedirective). This can be used if you don’t want to have a preview in the editor but just let your users configure a placeholder that is then rendered in some other system using the given parameters. - A
doc-includeservice with only a server part would render a preview in the editor and also render the placeholder when publishing. It doesn’t let your users interact with the rendering in the editor (no user interface). This can be used e.g. when a rendering is only dependent on something like the current time but on nothing that a user would set. - A
doc-includeservice with both server and editor parts has a user interface where a user can set parameters that are then used in the server-side plugin to render a preview and also render thedoc-includedirective upon publishing. This is the example we used in this section.
Resolve options
Includes can be resolved in two modes when rendering (i.e. publishing) a document. Either a <ld-include> tag can be rendered so the include can be resolved outside of Livingdocs (e.g. in a microservice). Or the includes can be resolved on the Livingdocs server in the rendering of the document.
Unresolved include
An unresolved include looks like this in the published document’s HTML:
<div>
  <ld-include
    data-include-service="embed-teaser"
    data-include-params='{"mediaId":2}'
  ></ld-include>
</div>
It contains all the information needed to replace it with the actual content.
Resolved include
If the include is resolved instead of the <ld-include> you see the actual HTML returned by the include renderer:
<div>
  <a href="/articles/2.html">
    <div style="background-image: url(https://image.jpg)"></div>
    <div class="teaser__text">
      <h3><span>Mathieu Pavageau</span> <span> on Wed May 25 2016</span></h3>
      <h2>Rocket</h2>
    </div>
  </a>
</div>